Your first board: workspace, board, groups and items
Create a workspace and a board, add groups and items, and open an item to see everything about it.
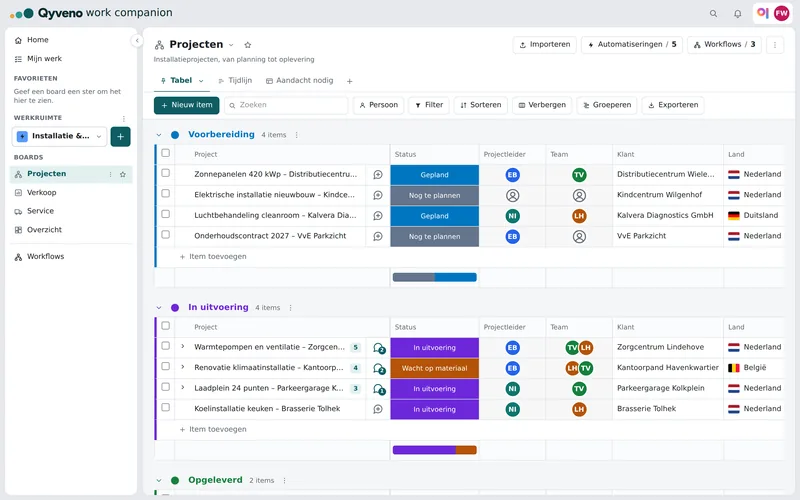
In Qyveno your work lives on boards. A board is a table: each row is an item (a task, a project, an order) and each column tells you something about that item. Boards live in a workspace, and inside a board you sort items into groups.
Choose or create a workspace
A workspace is a folder of boards, for example one per department or per customer. In the sidebar on the left, under Workspace, you see the workspace you are working in. Click it to pick another one, or choose All workspaces for the full overview.
To create a new workspace:
- Click the + next to the workspace picker (Add to workspace).
- Under Add to account, choose New workspace.
- Type a name and click Create workspace. You go straight to it.
If you don't see this option, your role doesn't allow it. Your admin can change that.
Create a board
- Click the + and go to Board › New board.
- Give the board a name under Board name.
- Under What are you managing on this board?, choose what you track: Items, Projects, Tasks, Orders, Customers or a Custom… word. You will see that word across the board. Pick Tasks, and the button says New task instead of New item.
- Click Create board.
A new board starts with one group and only the name column. You add the columns you need yourself; see Columns for how.
Don't want to start from scratch? In the same window, click Or start from a template. The Template center opens, with ready-made boards such as Project planning and Customers and leads (simple CRM). Pick one and click Use template. Already have a list in Excel? Save it as CSV and choose Import from CSV under Board: the rows in your file become the items.
Groups and items
Groups split a board into parts, such as "This week" and "Later", or one per phase. Each group has its own color.
- Add a group: click Add new group below the table, or use the arrow next to New item in the toolbar.
- Rename a group: click the group's name.
- More options: a group's menu has Change color, Duplicate group… and Delete group. The arrow in front of the name collapses or expands the group.
To add an item:
- At the bottom of a group, click Add item (or the word your board uses, such as Add task).
- Type the name and press Enter.
The New item button in the toolbar puts a new item straight into the first group. To rename an item, click its name.
Subitems
An item can have its own subitems, such as the steps of a task. Hover over the row and click the arrow in front of the name (Add subitem). A field for the first subitem appears. When an item already has subitems, their number shows after the name; click it to expand or collapse them. Subitems have their own columns.
Open an item
Each item has a small speech bubble after its name. Click it and the item panel opens on the right. There you find:
- Updates: the conversation about this item, with your colleagues.
- Files: everything attached to the item.
- Activity: who changed what, and when.
On a phone there is also a Details tab with the values from all columns. Close the panel with the cross or with Esc. Read more about updates in Updates and files.