Updates and files on an item
Write updates on an item, mention colleagues with @, pin, bookmark and set reminders, and add and view files.
Every item has its own conversation. That is where you write updates, mention colleagues and keep the files that belong to it. Everything about a task or project stays in one place instead of spread across email and chat.
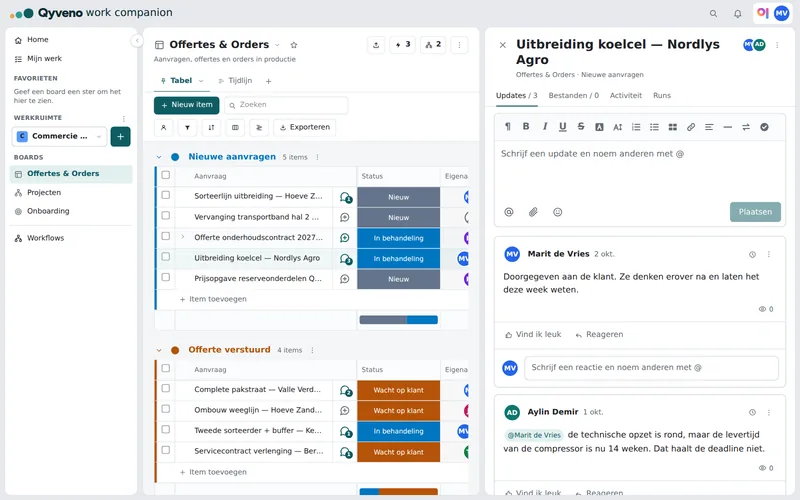
Writing an update
Open an item by clicking its name, or click the speech bubble next to the name: the item then opens straight on Updates.
- Click the field Write an update and mention others with @.
- Type your text. The formatting bar lets you make text bold or italic, or add a list, checklist, table or link.
- Type
@or click Mention someone to pick a colleague. They get a notification in the bell. - Click Post, or press Ctrl + Enter.
Below every update you'll find Like and Reply. A reply appears indented under the update. Mentioning someone with @ works in replies too.
To change your own update, click … at the top right of the update and choose Edit update. It then shows Edited at the bottom. Only people you newly mention get a notification. Delete update removes it.
Who has seen it?
At the bottom of every update there is an eye with a number. Click it to see who read the update, when, and whether that was on a computer or a phone. An update counts as seen once someone has had it on screen for a moment.
Pinning, bookmarks and reminders
The … menu on an update also has:
- Pin to top: the update moves to the top of the conversation, marked Pinned. Each item can have one pinned update. Choose Unpin to undo it.
- Add bookmark: save an update for later. Your bookmarks are in My work, on the Bookmarks tab. Only you can see them.
- Copy link to update: a link that opens the item and jumps straight to this update. Handy for pasting into an email or chat.
Use the clock on an update to set a reminder. Choose In 1 hour, Tomorrow morning 9:00, Next Monday 9:00 or Custom date and time. At that moment only you get a notification in the bell. While the reminder is running, the clock is highlighted. Click it to change the time, or choose Remove reminder.
Adding files
To attach files to an update, use the paperclip (Attach file). You can also drag a file into the field, or paste a screenshot. An update can even consist of attachments only.
All files of an item are on the Files tab: the ones from updates and the ones you upload separately. There you can:
- Add files with Upload, or by dragging them in.
- Switch between Grid and List.
- Use a file's menu to Download or Delete it.
Allowed are images, PDF, Word, Excel, PowerPoint, CSV, text and zip, up to 250 MB per file. A viewer can open and download files, but cannot upload.
Viewing files and versions
A PDF, Word, Excel or PowerPoint file shows up right in the update, in a viewer. There you can page through it, zoom in and out, Rotate, Print and go Full screen. On the Files tab, clicking a file opens the viewer across the whole screen, with arrows to the previous and next file. CSV and text files show as a table or as text. A zip file is downloaded.
Sometimes you'll briefly see Creating preview…. If a preview can't be made, you can always download the file.
Got a new version of a document? Choose Upload new version in the file's menu. The new version becomes the current one and the old one is kept. Version history lists all versions, with who uploaded them and when. For each version you can View, download, Set as current or delete it.